
CLAY GILLIE

Playing with clay is always a fun activity for kids and adults alike. Something about the squishiness is just so fun! So let’s make our very own Gillie clay toy.
Clay, like playdough, provides children with many opportunities to be creative and expressive by encouraging sensory development.
HOW TO MAKE CLAY GILLIE
YOU WILL NEED
White clay
Brown clay
Black clay
Pink clay
Red clay
A toaster oven (GROWNUP USE ONLY)
Wax paper and a baking tray
(Optional) A smooth round object like a marker

LET’S GET CRAFTING
STEP 1:
Wash your hands. When working with clay, you want clean hands or else all the ickiness that is on your hands will be mashed into the clay.

STEP 2:
Take your white clay and roll it into a ball and work the clay to make the shape of Gillie’s head. Special Note: Be sure to roll your clay in your hand to warm it up a bit. Clay is easier to work with when it is warmer.

STEP 3:
Take the same amount of white clay as you used for the head and make an oval-shaped ball.

STEP 4:
Press the head and the body together. Use your finger to blend the parts together.

STEP 5:
Use a small piece of white clay and work it into a small cone shape and place it at the bottom of Gillie’s body. You have officially made Gillie’s left leg.

STEP 6:
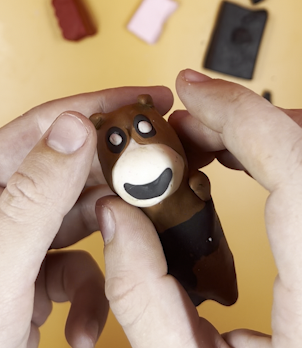
With your brown clay, you want to flatten it out and start shaping to the shape of Gillie’s markings on his face. Carefully lay it out on Gillie’s head, gently pressing and working the clay to form the head.

STEP 7:
Now you are going to do the same thing with the brown clay around the entire body.

STEP 8:
Take two small pieces of brown clay and shape them into two cones. These are going to be Gillie’s right arm and leg.

STEP 9:
With two more small pieces of brown clay, you are going to work them into oval-shaped balls and bend the ends. These are Gillie’s ears! You are going to take the unbent end and blend it into the top of Gillie’s head.

STEP 10:
Moving onto our black clay. Now be very careful with the black clay, this color likes to get all over your hands and can get on the colors VERY easily. You will even see it in my photo examples. You are going to do the same thing with the black that you did with the brown. Flatten it out into the shape of Gillie’s markings and lay them out over Gillie’s body. Gently working the clay in.

STEP 11:
Take a small piece of black and work it into a smiley face and add it to Gillie’s face.

STEP 12:
Then make two super small pieces of black into flat ovals and press them into where Gillie’s eyes would be.

STEP 13:
For Gillie’s last arm, take some black clay and make another cone and blend it into the side of our Gillie.

STEP 14:
Going back to your white clay, make two even smaller pieces of white into flat white ovals and press them into Gillie’s eyes.
STEP 15:
Use a small piece of pink clay and make a tiny heart. That’s Gillie’s nose!

STEP 16:
Last but not least is your red clay. This will be Gillie’s bandana. Shape it into a red triangle and wrap it around Gillie’s neck.

STEP 17 (GROWNUPS ONLY):
Get your grownup! They will place your Gillie in a toaster oven (or oven).
GROWNUP NOTE: Preheat oven to 200 degrees, place Clay Gillie on a baking sheet with wax paper, bake for 10 minutes.

